Sometimes things don’t go quite to plan. Whilst deploying a cluster with P3700 Intel drives, we had a situation where we needed to disable the cache as the drives were failing. This is a well documented issue that arose with poor firmware from Intel. Microsoft released a support article outlining the symptoms of this issue . The issue is resolved now and the latest firmware from intel will resolve the issue aforementioned.
The issue we experienced, was that once the firmware had been updated, and the cache re-enabled through the following command:
| |
we saw absolutely no performance increase at all.
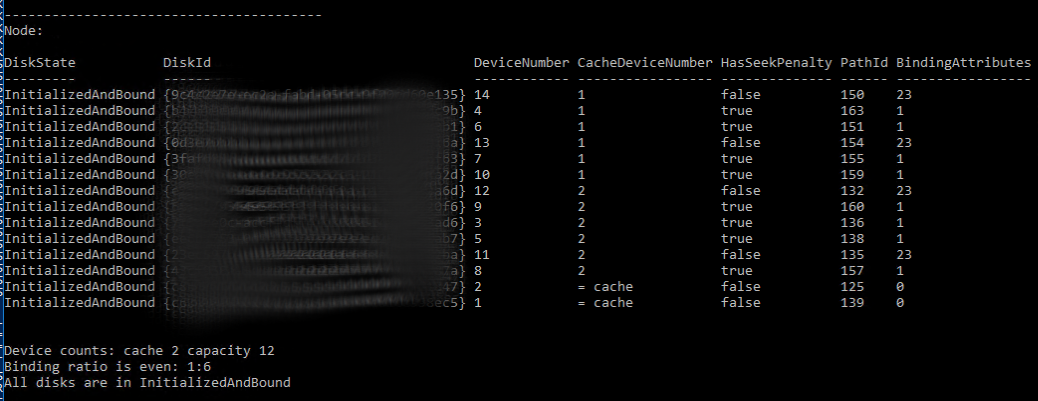
Digging deeper we saw that there were no cache drives being used by performance monitor. S2D cache drives work by creating a ‘bind’ between storage drives and cache drives. For example, if you had 8 storage drives and 4 cache drives, 2 disks would bind to each cache drive. This results in a cache bind of 2:1. You could also have 12 capacity drives, to 2 cache drives. This results in a cache bind of 6:1 (Which is what is in this example).
Darryl van der Peijl has written an awesome script to get the cache bind status of your drives, node by node.. It’s an awesome script, that I highly recommend adding to your swiss army knife for S2D!
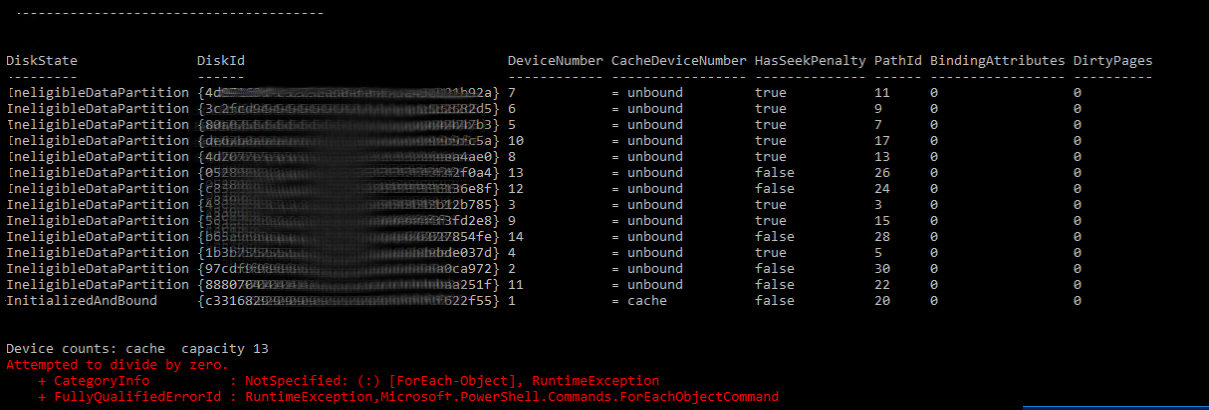
Running Darryl’s script we saw the following results.

As you can see in the screenshot, no drives are binding, and only 1 cache drive is being successfully seen. This was caused by the bastardisation of the cache status. On, Off, On, Insn’t a great idea unless absolutely necessary. The root cause of this is the storage pool information stored within the metadata partition isn’t compatible with re-enabling the cache. To resolve this you need to remove each disk. Clean all partitions, and re-add the disks with the cache enabled. I have a script that can do this disk-by-disk, but I’m not publishing it due to its harmful nature. I’ll happily provide you a copy if you reach out to me on LinkedIn.
The best method is to remove a node, clean all its disks, and re-add the node. To do this you will need the following:
- If HCI - Enough resources to handle the workload. N+1 (Accounting for 1 node being absent)
- Enough fault domains to remove a node.
- Enough storage capacity.
Microsoft has documented the scale back requirements quite well here. If you match all these and want to continue, read on!
Steps Overview
- Enable the Cache
- Check the cluster health
- Pause a node.
- Start the evacuation of a node.
- Repair virtual disk to complete evacuation.
- Finalise node removal.
- Clean the disks on the node.
- Re-add the node to the clusters
- Verify the cache drive binding
- Optimise the storage pools
- Repeat for the other nodes.
!Before beginning any of these
1. Enable the Cache
Check that the cache is enabled for the clusters
| |
If the cache isn’t enabled at the cluster level enable it:
| |
2. Check Cluster health
Check the health of key objects, examples below.
| |
You shouldn’t continue if you don’t understand the output from those 3 commands. Its nothing personal, but you are unlikely to be able to complete in-depth troubleshooting if you are unfamiliar with those commands.
3. Pause the first node
This is a standard process. Using either SCVMM, Failover Cluster Manager or the below powershell cmdlet to pause the node.
| |
4. Start evacuation of the node
- RDP to the nodes
- Check the hostname of the node you are connected to. Best to be safe!
- Run the following command:
| |
- The command will fail. This is expected as it was unable to remove the disks instantly. The command however has marked all disks as retired and started the physical disk removal.

- Check that the physical disk is marked as retired and removing from pools
| |

5. Repair virtual disks
Repair virtual disks so that their foot print is removed from disks operating on the node.
| |
This will most likely take a number of hours, keep checking in on the storage job until they are all complete.
6. Finalise node removal
Check that:
- The disks have all been removed (Show as can pool equals true)
- and that there are no virtual disk foot prints left.
| |
If both fine continue, otherwise head back to step 5 and rerun (Don’t stress, sometime you may need to repeat this a number of times, or ever reboot the node being removed to fully clear the disks)
If both are fine, rerun the remove command again, this time it will complete with no errors.
| |
7. Clean the disks on the node.
Once the node has been removed, we need to clear all partitions off the disks. Use the following to clear them up. Its an adaption of the script provided by MS as part of their recommended build guide, however its been sanitised to not touch other nodes.
| |
8. Re-add the node to the clusters
Don’t just go slapping nodes back in. Just because it worked before, is no reason to blindly add the node back in.
Run the test cluster cmdlet and read the output to see if there are any errors.
| |
From an existing cluster node, run the following cmdlet (Or re-add using SCVMM, or Failover Cluster Manager)
| |
9. Verify the cache drive binding
Once the node has been added back in. Re-run Darryl’s script to check the binding. You should now see an even binding of all drives to a cache drive.

10. Optimise the storage pools
Now that the node has been added back in, you need to redistribute blocks back to the node.
| |
For this entire process, you may find it intersting to watch the nodes virtualdisk footprint fall. I’d recommend Cosmos Darwin’s show-prettypool script
11. Repeat for the other nodes.
Once the storage jobs have completed, you can safely loop back to step 3 and repeat for all your other nodes. Good luck!